December 19, 2025, 02:21:00 PM *
Welcome, Guest. Please login or register.

Login with username, password and session length
News: Manky Monkey Motors Merchandise now available Cool Items at cool prices http://www.mankymonkeymotors.co.uk/merchandise.html
 
   Home   Help Search Calendar Gallery Login Register  
Pages: 1 [2] 3
  Print  
Author Topic: Mouse's Build  (Read 11602 times)
o0Mouse0o
Newbie
*

Karma: 0
Posts: 9


« Reply #15 on: March 09, 2010, 12:13:03 PM »

Hi,
Thanks for the interest in the Diesel Project Bike.

The engine is a 15PS 800cc V twin from a German utility vehicle called a Multicar M22. this is a short vid of some in action.
http://www.youtube.com/watch?v=nNyD9SmPfL0


This is the only time I got it to run before cleaning it and dragging it into the downstairs spare room to build the bike.
http://www.youtube.com/watch?v=rese_X5bWXI
PS I found out why the starter was not staying engaged!!

My engine was allegedly fitted to a generating plant and my hope it has been on standby for the last 36 years  Wink

The engine is rated at 15PS at 3000rpm I'm hoping it will be reliable at 3600 and maybe produce a little more uumph!
Design top speed of 63mph at 3600rpm with available BMW gears.

The engine has a total marked weight of 124kg. I've lightened the flywheel by 11kg and removed a lot of the bracketery and bits so the weight is just under 100kg now. Heavy but not out of the question for putting in a bike.


More detail of the gearbox flange...
http://www.aarrgghh.co.uk/ratbikes/DieselBike/Flange/Flange07.jpg
Mouse's Build


http://www.aarrgghh.co.uk/ratbikes/DieselBike/Flange/Flange17.jpg
Mouse's Build


http://www.aarrgghh.co.uk/ratbikes/DieselBike/Flange/Flange28.jpg
Mouse's Build

In this shot you can see how I've cut and shaped the flywheel to accept the BMW clutch unit.
If you look closley you should be able to see a bush in the flywheel centre. This accepts a 9mm silver steel bar which slides perfectly through the gearbox input shaft = gearbox and engine in alignment Smiley

http://www.aarrgghh.co.uk/ratbikes/DieselBike/Flange/Flange34.jpg
Mouse's Build


I should be making more progress next weekend so I'll cross post the update next Sun evening or Monday depending how motivated I am. 


PS Any tips and tricks to statically balance a flywheel by the garden shed engineer will be appreciated. 
Logged
Plasticpig
Hero Member
*****

Karma: 8
Posts: 780


« Reply #16 on: March 09, 2010, 04:14:50 PM »

I knew that cheese would wake him up.
Logged
Plasticpig
Hero Member
*****

Karma: 8
Posts: 780


« Reply #17 on: March 27, 2010, 04:00:22 PM »

Mouse took the bike for an MOT today and stopped in on the way home.
It failed, but only on small items so it should be sorted soon.
Logged
Manky Monkey
Administrator
Hero Member
*****

Karma: 264
Posts: 55102


WWW
« Reply #18 on: March 27, 2010, 07:53:25 PM »

That's fabulously ...odd.
Love the car battery strapped to the saddle, & a second cable tied to the engine. Wonder what the tester made of those!
Can we have a write-up for the site when it passes please.
Logged

On the last freedom moped out of Nowhere City.
Plasticpig
Hero Member
*****

Karma: 8
Posts: 780


« Reply #19 on: March 27, 2010, 10:02:56 PM »

I think he needed the second battery in case the first one died too early. The lump is supposed to be cranked by hand, but it turned over well with the starter.
Reason it looks a bit iffy is that he has been working on it all week to get it finished for the weekend.
Still a work in progress but a bloody good job.
Logged
Manky Monkey
Administrator
Hero Member
*****

Karma: 264
Posts: 55102


WWW
« Reply #20 on: March 27, 2010, 10:05:13 PM »

I think it's brilliant!
Logged

On the last freedom moped out of Nowhere City.
panthershaun
Hero Member
*****

Karma: 52
Posts: 3193


« Reply #21 on: March 28, 2010, 08:09:43 AM »

 Cool Cool Cool
Logged

you ain't it, till you've "Bobbed" a Brit!!!
trikerpete
Hero Member
*****

Karma: 30
Posts: 3585


like a head with a sore bear :)


WWW
« Reply #22 on: March 31, 2010, 09:43:55 PM »

 Smiley Smiley Smiley
Logged

what do you mean, I cant do that !! Smiley
o0Mouse0o
Newbie
*

Karma: 0
Posts: 9


« Reply #23 on: March 31, 2010, 10:55:57 PM »

The next and final instalment of my bike build.
I wrote this for another forum and don't really have the time to redo any of it so please excuse my potty mouth if I've left any foul language in it.  :oops:


First was the exhaust. After a brief discussion over at the Diesel Bike forum I found out that Diesels don't need as much silencing as a comparable petrol engine. So armed with this gem of knowledge I set about resuscitating The Sorties that got me pulled by the cops on their last outing. I think bought for a tenner about 18 years ago when I was on an XS250. 

http://www.aarrgghh.co.uk/ratbikes/DieselBike/Exhaust01.jpg
Mouse's Build

first was the flanges, using an old gasket as a template and a hole saw bought for about 50p from a carboot sale.

http://www.aarrgghh.co.uk/ratbikes/DieselBike/Exhaust02.jpg
Mouse's Build

Then it was a rummage right to the bottom of the shed to find The Sorties. They are in a bit of a state but.....

http://www.aarrgghh.co.uk/ratbikes/DieselBike/Exhaust03.jpg
Mouse's Build

Some soapy water and a scrubbing pad soon brings a glint back to them.

http://www.aarrgghh.co.uk/ratbikes/DieselBike/Exhaust05.jpg
Mouse's Build

A ninety degree bend was cut in two to give two forty five degree bends that were then brazed together. I'm running real low on Mig gas and want to avoid buying more until after the bike is finished.

http://www.aarrgghh.co.uk/ratbikes/DieselBike/Exhaust07.jpg
Mouse's Build

Cut short ready to fit the flange bits.

http://www.aarrgghh.co.uk/ratbikes/DieselBike/Exhaust08.jpg
Mouse's Build

The finished exhaust and a handful of real exhaust fiberglass wadding I bought many moons ago for the GSX550 rat exhaust.

http://www.aarrgghh.co.uk/ratbikes/DieselBike/Exhaust12.jpg
Mouse's Build

Pokeing it in with a Pokey Dokie!

http://www.aarrgghh.co.uk/ratbikes/DieselBike/Exhaust13.jpg
Mouse's Build

The finished thing all ready to install on the bike.

http://www.aarrgghh.co.uk/ratbikes/DieselBike/Exhaust15.jpg
Mouse's Build

 Cheesy

http://www.aarrgghh.co.uk/ratbikes/DieselBike/Exhaust10.jpg
Mouse's Build

You get rather a lot of wadding for your it for your money This has packed the GSX550 exhaust the Diesel ones and there is this much left over!


ALTERNATOR
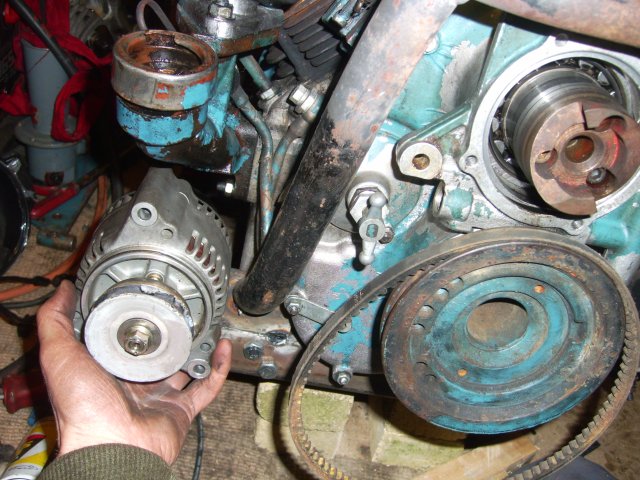
I've been hoarding a spare Bandit 1200 alternator (Actually the same as a whole bunch of the larger GSX based engines) the alternator has a tapered shaft which holds a cush drive and gear for driving it. Rather than spending a whole lot of time on a lathe turning a tapered boss up I simply dismantled the cush drive and the pulley wheel from a car alternator slipped over the shoulder on it with minimal filing. The two were brazed together after which it can be easily bolted to the alternator shaft.

http://www.aarrgghh.co.uk/ratbikes/DieselBike/Alternator01.jpg
Mouse's Build

The tapered part fo the cush drive and the car alternator pulley.

http://www.aarrgghh.co.uk/ratbikes/DieselBike/Alternator02.jpg
Mouse's Build

The pulley filed out and placed in position on the cush drive bit.


http://www.aarrgghh.co.uk/ratbikes/DieselBike/Alternator03.jpg
Mouse's Build

Brazed together and cooling before I pick it up.  :wink:

http://www.aarrgghh.co.uk/ratbikes/DieselBike/Alternator04.jpg
Mouse's Build


http://www.aarrgghh.co.uk/ratbikes/DieselBike/Alternator06.jpg
Mouse's Build

Bolted onto the tapered shaft of the alternator.

http://www.aarrgghh.co.uk/ratbikes/DieselBike/Alternator07.jpg
Mouse's Build

The position it will be fitted in. Opposite the starter motor in a futile attempt to balance the bike.

http://www.aarrgghh.co.uk/ratbikes/DieselBike/Alternator08.jpg
Mouse's Build

Mounted and adjustable. This is fully one way...

http://www.aarrgghh.co.uk/ratbikes/DieselBike/Alternator09.jpg
Mouse's Build

and this is fully the other way!
Now all I need is a belt to fit, This will wait until I can ride it to the Bearing & Pully shop so they can measure it themselves. I've had trouble specifying belts with them in the past.


http://www.youtube.com/watch?v=zeLQwl3zJ-s
Video of the smooooth adjustable action.

FRONT END
After abandoning the idea of building my own front suspension for the moment as the work and effort is worthy of a project of its own. So instead I will fit a Bandit 1200 front end as I have one on a dead bike. I've fitted new bearings to the BMW headstock and the Suzuki spindle is just as wrong as it could be so I heated up the ally bottom yolk and beat out the spindle so I could for a new one. I turned down some 25mm bright bar I already had and will hold it and the yolks together with a nut at each end. I'd prefer to use metric fine and also not use chunky nuts. After a lot of hunting about for cheap dies and nuts I chose to use M20 metric fine (1.5 pitch) because it...
A] Is the same thread as a VW car front hub nut and therefore cheap light weight nuts are available.
B] It is the same thread as electrical conduit trunking and therefore cheap dies are available.

Don't underestimate the cost of dies. If I went to a machine shop and bought a good quality M20 metric fine die it would be about £90 but a conduit die, Screwfix sell them for about a tenner but  suspect the quality.

http://www.aarrgghh.co.uk/ratbikes/DieselBike/Spindle01.jpg
Mouse's Build

This is the blank spindle turned down from a piece of 25mm bright bar.

http://www.aarrgghh.co.uk/ratbikes/DieselBike/Spindle02.jpg
Mouse's Build

One end is shoulderd to take the top yolk and a nut.

http://www.aarrgghh.co.uk/ratbikes/DieselBike/Spindle03.jpg
Mouse's Build

The other end is turned to take a nut.

http://www.aarrgghh.co.uk/ratbikes/DieselBike/Spindle04.jpg
Mouse's Build

After going to the shed to cut the thread I realised I didn't have a die holder thingy so I made one with a bit of tube and some bar.

http://www.aarrgghh.co.uk/ratbikes/DieselBike/Spindle05.jpg
Mouse's Build

This took about 45 mins to make and worked very well.

http://www.aarrgghh.co.uk/ratbikes/DieselBike/Spindle06.jpg
Mouse's Build

After struggling to start the thread straight I simply popped my spirit bubble on the die and all went well after that.

http://www.aarrgghh.co.uk/ratbikes/DieselBike/Spindle07.jpg
Mouse's Build

The El Cheapo die was s**t, it cut the thread but only just and it lost cutting teeth as about 5 - 6 of them chipped off. I didn't enjoy using it at all as it felt like it was going to lock up and smash the whole time I was using it, but at least it did the job for £10 Cheesy

http://www.aarrgghh.co.uk/ratbikes/DieselBike/Spindle08.jpg
Mouse's Build

One thread cut.

http://www.aarrgghh.co.uk/ratbikes/DieselBike/Spindle09.jpg
Mouse's Build

Other thread cut.


GEARBOX FLANGE ALIGNMENT.
I've been putting this off for a bit because I have to completely dismantle the bike to get to the flywheel.
For this to work properly I need to get the engine shaft and the gearbox shaft aligned as best I can, preferably perfectly.

http://www.aarrgghh.co.uk/ratbikes/DieselBike/Flange35.jpg
Mouse's Build

I've borrowed a friends magnetic surface gauge to help me. The magnet is stuck to the cast cylinder fins and the business end is on the inside of the flywheel centre bush I made.

http://www.aarrgghh.co.uk/ratbikes/DieselBike/Flange41.jpg
Mouse's Build

Now in order to turn the engine with minimal force I took the rockers off and removed the push rods so I'm not having to compress the valve springs. I also inserted the bit of wood so the valves are kept open a bit and there is no compression.

http://www.aarrgghh.co.uk/ratbikes/DieselBike/Flange36.jpg
Mouse's Build

The error is 0.006" or 0.15mm. I'm not happy but continue.

http://www.aarrgghh.co.uk/ratbikes/DieselBike/Flange37.jpg
Mouse's Build

Inserting a length of 9mm ground bar the error is now 0.005" 0.13mm.

http://www.aarrgghh.co.uk/ratbikes/DieselBike/Flange38.jpg
Mouse's Build

The gearbox slides over the 9mm bar and the flange is held down but not tightened so as the engine is rotated the surface gauge will indicate the error in alignment. It is unsurprisingly 0.005" out  Sad

Not happy with 0,005" I tok it all apart and back together about three times and after a bit of tapping with the rubber mallet I managed to get it so the surface gauge didn't flinch at all as the engine was rotated  Cheesy

http://www.aarrgghh.co.uk/ratbikes/DieselBike/Flange39.jpg
Mouse's Build

You'll have t take my word on it that this is where the needle stayed!!
After this was achieved the bolts holding the flange plate to the bell housing were carefully nipped up tight.

http://www.aarrgghh.co.uk/ratbikes/DieselBike/Flange40.jpg
Mouse's Build

After that the gearbox was removed to that locating holes and pins could be fitted.

http://www.aarrgghh.co.uk/ratbikes/DieselBike/Flange42.jpg
Mouse's Build

These are the engineering pins and the hole they go in. They are tapered ones so I had to ream the 6mm hole out with the correct matching tapered reamer.

http://www.aarrgghh.co.uk/ratbikes/DieselBike/Flange43.jpg
Mouse's Build

In it goes....

http://www.aarrgghh.co.uk/ratbikes/DieselBike/Flange44.jpg
Mouse's Build

And tapped home with my smaller hammer = Everything in alignment again  Cheesy

http://www.aarrgghh.co.uk/ratbikes/DieselBike/Gearboxs.jpg
Mouse's Build

I then had to reassemble the gearbox because I was suffering a severe case of lazyc**titus when I decided to mend it so I'd have a working spare on the shelf. This was about 5 years ago. The original fault that made me take it apart was a broken Shift Pawl Return Hair Pin Spring!!

GEARBITS
http://www.aarrgghh.co.uk/ratbikes/DieselBike/GearBit1.jpg
Mouse's Build

The foot lever is connected with two ball joint thingys like this one.

http://www.aarrgghh.co.uk/ratbikes/DieselBike/GearBit3.jpg
Mouse's Build

However I'm missing the 'ball' bit of the second one so a fix is needed.
After a bit of a rummage in the bits box I found a couple of grease nipples and the body of the nipple is almost exactly what I need.

http://www.aarrgghh.co.uk/ratbikes/DieselBike/GearBit2.jpg
Mouse's Build

The foot lever was then tapped out to M7 (Yep you read that right!)

http://www.aarrgghh.co.uk/ratbikes/DieselBike/GearBit4.jpg
Mouse's Build

In action and working!!
http://www.aarrgghh.co.uk/ratbikes/DieselBike/GearBit5.jpg
Mouse's Build

I also had to adjust and fit the break lever arm bits.

http://www.aarrgghh.co.uk/ratbikes/DieselBike/GearBit6.jpg
Mouse's Build

Making little fiddly bits like this adjustable cable end holder bit takes about an hour!

SIDE STAND
http://www.aarrgghh.co.uk/ratbikes/DieselBike/Stand01.jpg
Mouse's Build

Next was a side stand. the wheels are on the bike and I need to move it about without having to chock it up on bricks every time. This is a spare stand from the sidecar project of yesteryear. (It can stand up by its self  :wink: )

http://www.aarrgghh.co.uk/ratbikes/DieselBike/Stand02.jpg
Mouse's Build

LOOK! The bolt holding the stand on is a tad smaller then the hole in the mounting bracket cut from the bike frame so I could fit the diesel engine.

http://www.aarrgghh.co.uk/ratbikes/DieselBike/Stand03.jpg
Mouse's Build

http://www.aarrgghh.co.uk/ratbikes/DieselBike/Stand04.jpg
Mouse's Build

After another rummage in the gas fittings bits box I found this bit that looks like it may be brassy and useful.

http://www.aarrgghh.co.uk/ratbikes/DieselBike/Stand05.jpg
Mouse's Build

It was then up into the attic to my epically s**t mini lathe for some rotating butchery.

http://www.aarrgghh.co.uk/ratbikes/DieselBike/Stand06.jpg
Mouse's Build

More uber s**t lathe action. I am not cutting with a trowel I am using it as a shim  :wink:

http://www.aarrgghh.co.uk/ratbikes/DieselBike/Stand07.jpg
Mouse's Build

From another angle - Note the lay-shaft assembly.

http://www.aarrgghh.co.uk/ratbikes/DieselBike/Stand08.jpg
Mouse's Build

The business end!

http://www.aarrgghh.co.uk/ratbikes/DieselBike/Stand09.jpg
Mouse's Build

There we have it a s**tty turned brass bit.

http://www.aarrgghh.co.uk/ratbikes/DieselBike/Stand10.jpg
Mouse's Build

Does the job simply perfectly.

http://www.aarrgghh.co.uk/ratbikes/DieselBike/Stand11.jpg
Mouse's Build

The bracket bit welded in place and the side stand assembled in place!


HEADLAMP
http://www.aarrgghh.co.uk/ratbikes/DieselBike/Headlamp02.jpg
Mouse's Build

I was relying on the leftover Bandit 1200 headlamp and shell but when I went to mount it I saw that the reflector was shagged, The photo hides a lot but you see the orange tint which is the rust inside it

http://www.aarrgghh.co.uk/ratbikes/DieselBike/Headlamp01.jpg
Mouse's Build

After a hard think I remembered I had a VW reflector left over from something else and probably only set me back a fiver or so.

http://www.aarrgghh.co.uk/ratbikes/DieselBike/Headlamp03.jpg
Mouse's Build

It is the same diameter (almost) to the damaged one except for the mounting brackets.

http://www.aarrgghh.co.uk/ratbikes/DieselBike/Headlamp04.jpg
Mouse's Build

The other mounting bracket.


http://www.aarrgghh.co.uk/ratbikes/DieselBike/Headlamp05.jpg
Mouse's Build

Half a cup of tea later I decided to swap the brackets over. SO using some cunning and a pair of mole grips I removed the bracketry bits.

http://www.aarrgghh.co.uk/ratbikes/DieselBike/Headlamp07.jpg
Mouse's Build

Then I marked out the mounting points and cleaned the paint back to the bare metal ready for fitting..

http://www.aarrgghh.co.uk/ratbikes/DieselBike/Headlamp08.jpg
Mouse's Build

Using the welder on its lowest setting I welded the buggers on!

http://www.aarrgghh.co.uk/ratbikes/DieselBike/Headlamp09.jpg
Mouse's Build
#
The brackets line up with the rest of the bits.

http://www.aarrgghh.co.uk/ratbikes/DieselBike/Headlamp10.jpg
Mouse's Build

 Cheesy  Finished. a completely refurbished headlamp.

http://www.aarrgghh.co.uk/ratbikes/DieselBike/Headlamp12.jpg
Mouse's Build

Head lamp shell fitted  and the main wires poked through ready to connect up.

FINISHED!!!!!!
http://www.aarrgghh.co.uk/ratbikes/DieselBike/Finished1.jpg
Mouse's Build

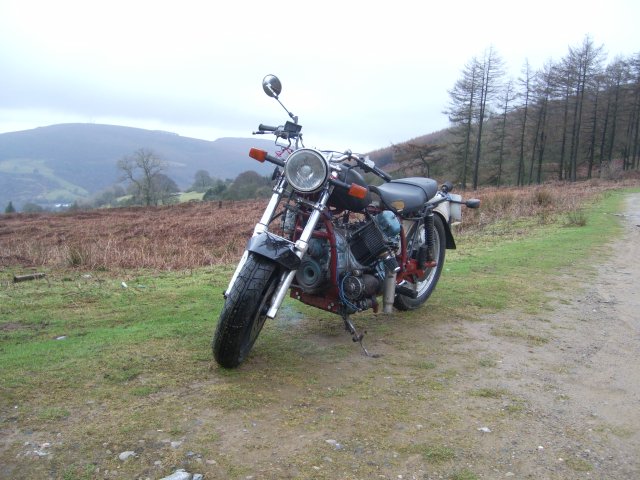
The finished Bike ready for MOT.

http://www.aarrgghh.co.uk/ratbikes/DieselBike/Finished2.jpg
Mouse's Build


http://www.aarrgghh.co.uk/ratbikes/DieselBike/Finished3.jpg
Mouse's Build


VIDEO.
http://www.youtube.com/watch?v=7MdpgARjh8M


It Failed the MOT on a few things but the main ones were,
A] Knackered rear disc, I didnt spot some rust pitting that almost caused the needle on the brakeometer in the test station to snap off.
B] Knackered pissing oil and 'riding low' rear shocks.
C] Cant turn the engine off without letting go of the bars ie Kill Switch inoperative, he dug his heals in over this one

So not serious just a pain and having to spend money on a rear disc  Sad

PS:I've done about 300 miles on it now and its running OK.
Logged
SUMO
Sr. Member
****

Karma: 8
Posts: 300


WWW
« Reply #24 on: April 01, 2010, 10:49:08 AM »

C] Cant turn the engine off without letting go of the bars ie Kill Switch inoperative, he dug his heals in over this one


strange - i run a mag on my shovel and it has a ground wire on the mag body that you have to lean down and squeeze to kill the engine - one of the few things my mot man doesnt rais an eyebrow at...
Logged

Plasticpig
Hero Member
*****

Karma: 8
Posts: 780


« Reply #25 on: April 04, 2010, 11:04:33 AM »

I just spoke to Mouse after he posted on the Rat Bike Zone.
His bike passed the MOT, but the oil filler cap fell off on the way home and the engine seized.
I do feel sorry after all that work.
Logged
Manky Monkey
Administrator
Hero Member
*****

Karma: 264
Posts: 55102


WWW
« Reply #26 on: April 04, 2010, 11:29:14 AM »

Bugger.   Angry
Logged

On the last freedom moped out of Nowhere City.
panthershaun
Hero Member
*****

Karma: 52
Posts: 3193


« Reply #27 on: April 04, 2010, 11:36:44 AM »

Bobcat doesn't have a means of turning her off, I just retard the ignition and put me hand over the end of the carb... Grin Grin
Logged

you ain't it, till you've "Bobbed" a Brit!!!
voodoo
Hero Member
*****

Karma: -55
Posts: 1710


WWW
« Reply #28 on: April 04, 2010, 02:55:20 PM »

HHmm mine has no kill switch either?...I have to turn it off with the key that is on my Electrics box under my seat.....never had anyone say anything at mot times and ive used a few different garages over the years...Voodoo....
After looking through your build I must say very impressive work a man of great skill....Hope you get it sorted out again...
« Last Edit: April 04, 2010, 06:37:53 PM by voodoo » Logged

Custom Paint Spraying...
English by Birth..Biker by choice....
Growing old is inevitable...Growing up is optional....
madron
Hero Member
*****

Karma: 14
Posts: 533


« Reply #29 on: April 04, 2010, 04:58:21 PM »

wow what a build love the engineuaty if thats the correct spelling and will be useing a spirit bubble fom now on when tapping threads thanks for that learn sumat new everyday lol
shame it seized but it still ran an only few teething problems for mot
and as for kill switches EVERBODY SHOULD FIT ONE  as now got a nakerd leg when throttle stuck open an had to step off and my eldest son didnt even get that choice rip shane  n still missin ya
so please make sure you have an easy to reach and quick means of killing ya engines
Logged
Pages: 1 [2] 3
  Print  
 
Jump to:  

Powered by MySQL Powered by PHP Powered by SMF 1.1.18 | SMF © 2013, Simple Machines Valid XHTML 1.0! Valid CSS!