TRIKE FRAMES-BACK IN BLACK. PART 7.

Home / Forum / Pictures / Bikes / Trikes / HotRods

Page 1
Page 2
Page3
Page 4
Page 5
Page 6
Page 7
TRIKE FRAMES-BACK IN BLACK. PART 7.

Part 7. Whod’ve thunk it eh? I’m sure you’ll be relieved to know this is the final, final, definitely last ever chapter of this series. Maybe.
It was supposed to be just a few quick lines on knocking together a frame, just to give you a rough idea of what’s involved, (& to fill some space on the website!). Seems to have grown & grown though. If you’ve stuck with me this far I assume

you’re actually interested in it all, so although this is the last piece of the frame story, I’ll bung in more build updates as & when there’s some progress to report. My job was to design the trike as a whole & create the frame. Now it’s up to Simon, the owner, to put it all together -with a little help & supervision from yours truly. Conceptual artist, design consultant, fabricator -is there no end to my talents. And all for free. I’m far too nice for my own good you know.
So what can I show you to bring this blockbuster to a close? Wanna see the finished frame, fresh from the coaters, in glorious, glossy black? O.K then.
 
This is how we last saw it. It’s taken several months of odd afternoons & evenings to get to this stage. We’re not particularly fast workers & everybody has jobs, social lives, partners & all sorts of other stuff that get in the way & slow
things up. If we’d worked flat out, every day, with all the materials to hand & all the machined parts ready-made, we could probably produce this in a couple of weeks. But real life ain’t like that!
 
Ta daa!!
The moment you’ve all been waiting for! The finished Manky Monkey Motors frame.
Oooh! Don’t you just want to run your fingers over that super shiny, smooth, glossy black finish! Well don’t even think about it. We don’t want your sticky little finger prints all over it! Go on, stand over there, out of reach. For those of you who don’t know, this is powder-coating. I’ve said all this before, but at 100 microns thick, it’s 5 times thicker than normal paint & is much more weatherproof & hard wearing. It’s also petrol & brake fluid resistant. If you’ve been browsing the
Gallery you’ll know I use it on all my bikes these days. It’s a softer finish than paint so tends to scuff, rather than chip or flake & will accept a suprising amount of flexing without damage. I’ve used it on coil springs with no problems. It’s also about half the cost of a normal paintjob. It can only be used on metal parts though, which must be free of body filler. The components are hung in a spray booth on metal hooks & a small static electrical charge passed through them via the rail the hooks hang on, before the dry powder is sprayed on using a modified paint gun. It clings to the charged metal surface then, when put in a drying oven for an hour or so, melts & forms a smooth continuous coat. Clever huh?
 
Several design alterations, lots & lots of head scratching & just standing, looking at it, hours & hours of hack-sawing,
bending, welding, & back-breaking filing have gone into this. Quite a few cake breaks too.
 
I think it was worth it though don’t you?
 
 
Look at the arse on that! Really pleased with the way the hardtail’s worked out. I’ve tried to keep it as simple as possible while still being structurally sound & hopefully pleasing to the eye. There are only 9 bends in the whole frame but careful planning means it manages to look nice & curvy while actually being mainly straight lines for greater strength. Radiused
gussets at the main stress points help the rounded look as well. The bumper bar was a new idea that worked out surprisingly well. Originally intended as just a carrier for the number plate, it helps to visually & physically tie the back end together, adding a nice continuous curve to what would otherwise be a fairly pointy, angular part of the frame. It’s made from the same 1 ½” bore as the top tube because the smaller 1” would’ve just looked too skinny. Shows off that glossy black coating well doesn’t it. The number plate is a standard 9” x 7”.
 
Rigid frames just look so clean & uncluttered don’t they. I’ve been riding hardtails for years & happily do a hundred miles between petrol stops quite comfortably. They’re definitely an acquired taste & can be a bit lively at speed on bumpy
country lanes, (can’t they Karen!), but are perfectly happy on normal A roads. You do get very good at spotting pot-holes though, but unfortunately, with 3 wheels spanning the road, you’re guaranteed to hit them with at least one corner! You can see here how the welds on the rack/pillion frame-work have been smoothed out. Looks lovely -nice, flowing lines. SO much time & effort has gone into making this all look deceptively simple.
 
Those gussets are an eighth of an inch thick. The down tubes are an inch & three eighths outside diameter & the top tube is over an inch & three quarters. It might look small & lightweight, but this frame’s built like a Sherman tank. You can’t see
them, but I’ve built two recessed LED light mounts, similar to the number plate ones, into the underside of the top tube. These LEDs are blue & will be wired into the normal lighting circuit to illuminate the polished & powder-coated engine at night. They’re matched by blue neon spark plug caps that flash as the plugs fire. Simon’s idea. In all other areas I was given a free hand to do more or less what I liked, so they’re my one concession to the customer. I may be an artist but one has to be commercial you know.
 
My original design had the tank sitting level to the ground, but once the basic frame was built Simon decided he wanted to be sat lower “into” the trike, rather than feeling perched up on top of it. Could’ve dropped the seat height by another 2 inches but that would’ve meant ripping the back end apart again. The only other change we could make was to raise the nose of the tank by 2 inches. It now follows the line of the top tube. That meant cutting off the standard front tank mounts &
making up new ones, plus welding a fill-in panel into the front of the tunnel. I later ended up replacing the rear mounts with tidier ones too. Our MIG won’t weld the thin sheet of the tank without burning through so I grafted the new mounts onto the factory welded brackets -the sticky out bits with the bolt holes in are mine. The ugly patches on the face of the tank are theirs. My tunnel filler plate is welded to the original raised welded seam of the tank. I didn’t want to grind it back flush & risk it leaking so decided to make a feature of it instead. I also donated a flush-fitting aircraft-style filler cap from a previous project which has replaced the raised screw-on cap, so quite a lot of work has gone into this little petrol receptacle!
 
Slap a nice thick coat of powder on it & you’d never know it didn’t leave the factory like this. If anybody dares stroll past
this bike at shows & just glance at it, they’ll be dragged back & forced to admire it! Here we see the tank being demonstrated by my lovely photographic assistant, Simon.
 
All these parts, including the satin black headlight shell, a couple of metallic silver parts for Darren’s orange trike & the two right-angled bars, which bolt to the floor of my garage to padlock the door to, shot blasted & coated, came to 100 quid.
What a bargain! Dropped them off on a Monday afternoon. First thing Wednesday morning I got a phone call to say they were ready for collection, all wrapped up in protective foam sheet. They’re an industrial coater though, rather than a show quality one, & because they shot blast & spray in the same workshop, you occasionally find little pin heads of grit trapped under the coating. There are one or two on this frame but fortunately they’re all in areas where they won’t show. For that cost we won’t complain though. The frame, yokes, tank & bars will be gloss. The lights, battery box & mudguards will be satin. The saddle will be sat on.
 
Taken in the Manky photographic studios. The hand on the right belongs to Nigel, my garage elf. The whole thing has been built with just a pipe bender, a MIG welder, a 4 ½” angle grinder, a drill & a hacksaw. Oh yeah, my tip of the day: I use a white “Tippex” correction fluid pen for marking metal. Easy to see, works on any surface & can be rubbed off if you make a mistake! The only specially machined components were the bearing cups in the headstock, the pedal pivots, 2 horizontal
tubes welded into the top tube to mount the tank to & 4 vertical ones set into the corners of the rack to take the locating pins of the removable pillion pad. We had a pair of aluminium yokes machined up as well, but only because I knew a man who could at an affordable price, otherwise we’d have used standard factory ones. No special jigs or patterns. Just a plumb-bob, spirit level, engineer’s square & steel rule. And lots & lots of measuring, checking & checking again! Everything was temporarily tack-welded in place & wasn’t fully seam-welded until we were absolutely sure it was right. Having said that though, we weren’t working to any sort of plan or drawing. Just ideas in my head.
 
The proud owner shows off his steed. There’s something very satisfying about creating something literally from nothing. A
totally one-off design, tailor-made for him. It looks tiny but Simon’s really 7 foot 6! Harr ha ha! No he’s not. He’s a little vertically challenged, bless ’im, but at least he won’t have to worry about reaching the ground now. It fits him perfectly. Hopefully he’ll get a lot of fun out of riding it & can confidently park it alongside the best of them at shows & rallies.
 

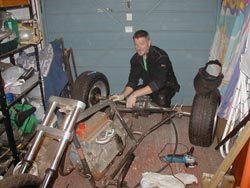
The face behind the mask. -Wha’dya mean, put it back on!
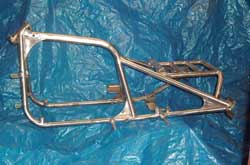
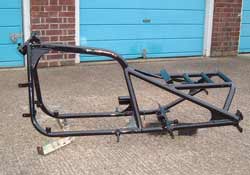
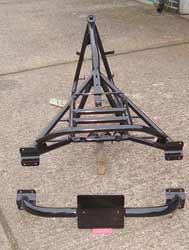
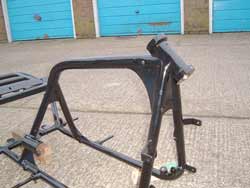
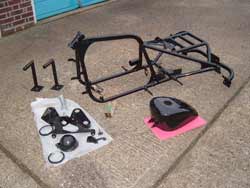
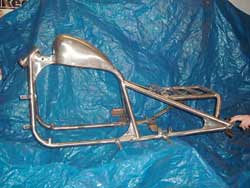
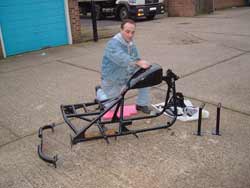
The author at work. Well, that’s about it folks. Really can’t think of anything else to tell you. We’ve covered everything from a pile of grubby parts on the garage floor, to a fully finished, custom built frame. Wasn’t too difficult was it! Nothing that can’t be achieved with a few basic metal-working skills & some common sense. Next time you’re at a bike show, take a closer look at the custom stuff -could you do better? What would you change?
Well, I think my work here is done, so I’m off to start my next Manky masterpiece. Pass me that hacksaw will you!

This show was brought to you by the letter M & the number 3.
The cast in no particular order were:
Simon -owner of the finished frame, who paid for all the materials used, got in the way & kept us supplied with chocolate.
Nigel -Owner of the garage where the deed was done, now ankle-deep in grinding dust & metal off-cuts. New owner of my old frame.
Darren -Owner & co-builder of the previous project, who wasn’t directly involved in this build, but has been on hand to eat cakes & take the mickey whenever necessary.
Yoda, the Webmaster, who has steered me through the intricacies of this new-fangled technology & posted the results here for you -& put up with my constant proof-reading niggles.

And me! Andy. Who’s spent his afternoons & weekends toiling away in the garage, & his evenings hunched over a keyboard, trying to explain it all to you lot. Feel like I’ve cut, welded & ground enough steel in the last few months to build an oil rig.

A couple of phone numbers for those that may actually be inspired to try a little project of their own:
Reg Lock. Self employed machinist, who produced all those little bits & pieces without which this creation would never leave the garage. Basingstoke, Hants. 01256-333108.
Doug Newell. Manager of “Waldham Precision Engineering“, who made the aluminium “slab” yokes, stainless steering stem & mild steel headstock bearing cups. Basingstoke, Hants. 01256-359898.
“Pipeline”, who supplied all the tubing used. Basingstoke, Hants. 01256-868200.
“A & C Shotblasting”, who will blast & coat just about anything, quicker & cheaper than just about anybody. Newbury, Berks. 01635-523775.

O.K, that’s me done. Hope it’s been of some use to somebody out there. I’ve enjoyed putting this write-up together so I’ll add a few more short pieces as the final build progresses & throw in a couple of extra chapters on my own new frame as well.
Will the last one out of the garage turn out the lights please.