Stix
Sr. Member

Karma: 31
Posts: 453
|
 |
« Reply #180 on: May 12, 2015, 01:17:50 PM » |
|
sorry should have said a couple of days ago, cheque arrived and going in bank thursday.
Stix
|
|
|
|
|
 Logged
|
|
|
|
|
minimutly
|
|
« Reply #181 on: May 13, 2015, 12:31:35 AM » |
|
Progress, albeit slow progress. Managed to persuade the disc doctor to make me a new carrier, hopefully in the next two weeks. So I can get on with the other jobs.
In currently remaking the foot plates for the pillion, reusing the original chequer plate (yes I know), however there is much less of it, and it will be painted black.
I've also made a pair of side panels for below the seat, and another bit of recycling means I've made a seat box out of the sides of our old clothes drier. A bit thin, but a folded edge has helped.
Next I need to make some lugs to attach the panels to the frame, and a lower side panel to protect the prop from errant laces etc.
I've made a list, it's half an a4....
Priority is lugs for foot plates, brake pipes, handbrake mounting and cables, rear diff torque reaction bracket, then at least I can paint it - oops, forgot gussets for the new rear end first.
|
|
|
|
|
Logged
|
|
|
|
|
minimutly
|
|
« Reply #182 on: May 31, 2015, 08:56:29 PM » |
|
Progress this weekend:
I finally got round to correcting two frame alignment issues, the axle mounts were 1/4 inch out laterally - in other words one wheel was in front of the other. This proved to be a relatively easy fix, I just cut the metal out of the rear frame and re welded the axle mounting bracket.
The other fault was potentially more difficult to fix - the trike had a list to the left of 1 degree. The problem was i'de done some stiffening/triangulation work previously, which made the job a pig. Various joints had to be cut and rewelded, which, along with a 4 ton body jack did the trick. I had to extend one of the under seat diagonals by 12mm, this meant slash cutting, inserting a tube and welding in a new, longer piece.
Happily, I now have a straight frame attached to a vertical bike front end. The reason for this problem occurring was that I hadn't removed the engine when I built the frame, hence I couldn't check the frame using the swing arm pivot holes as a reference. With the engine out, all became obvious.
As Benny hill said, learning all the time...
It just goes to show that building a trike without a jig, or at least a frame is nigh on impossible while the engine is still in the frame, should have known better I guess. One other thing, I now have a magnetic digital angle gauge, which can be dropped onto any bar, axle or tube - a must have I'd say.
Next is the gussets for the frame, followed by the sissy bar and grab handles. I can smell the paint allready.
|
|
|
|
|
Logged
|
|
|
|
|
andyrennison
|
|
« Reply #183 on: June 03, 2015, 09:32:37 PM » |
|
Huw, how did you measure to an accuracy of one degree. I'm impressed!
|
|
|
|
|
Logged
|
Thousands of candles can be lit from a single candle,
and the life of the candle will not be shortened.
Happiness never decreases by being shared
|
|
|
|
terry t
|
|
« Reply #184 on: June 03, 2015, 10:15:41 PM » |
|
Built mine with engine still in frame. set bike up on bench level and plumb ran a line down centre of frame for axle and checked back from swing arm pivots for square. mine runs straight and handles well on corners and roundabouts  |
|
|
|
|
Logged
|
|
|
|
|
minimutly
|
|
« Reply #185 on: June 03, 2015, 11:24:42 PM » |
|
One of these little burgers: http://www.ebay.co.uk/itm/GemRed-Digital-Angle-Finder-Gauge-Bevel-Box-/120687905972?pt=LH_DefaultDomain_3&hash=item1c198f4cb4I've had it a while, but couldn't use it because the frame isn't symetrical ( and old), until I took the engine out so I could run a tube across the rear swing arm pivot points. I'm not saying it wouldn't have run true, the original trike was fine, and everything was bent on that. The only issue I had riding it was the head shake at low speed, but I'm of the opinion that was more to do with chassis flex than anything else, and I've pretty much sorted that. Anyway, all welded up now, making gussets, priming bits I can, need to make a low cissy bar. I really hope I can paint the frame in the next week or two. Then I need the disc doctor to sort my front disc out, and we'll be almost ready to rebuild... |
|
|
|
|
Logged
|
|
|
|
|
andyrennison
|
|
« Reply #186 on: June 04, 2015, 08:44:48 AM » |
|
|
|
|
|
|
Logged
|
Thousands of candles can be lit from a single candle,
and the life of the candle will not be shortened.
Happiness never decreases by being shared
|
|
|
|
minimutly
|
|
« Reply #187 on: June 08, 2015, 10:23:26 PM » |
|
Gussets, gussets everywhere....
Frame really coming on now, lugs for brake pipes done, pillion foot plates and lugs done, ally side panels cut down from originals done, and did I mention gussets?
I've bought some metallic purple (the original colour), and some high build primer, so with some luck I can put some paint on it soon. I just hope I don't forget something....
|
|
|
|
|
Logged
|
|
|
|
|
minimutly
|
|
« Reply #188 on: June 14, 2015, 04:37:20 PM » |
|
Some pics 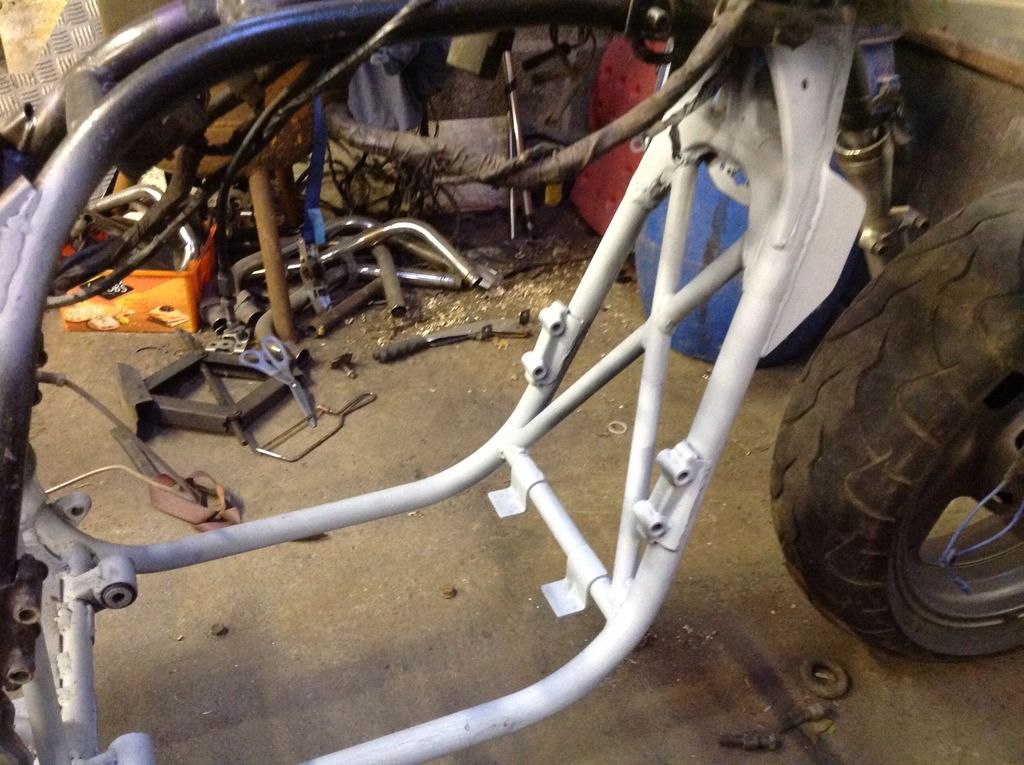 Kawasaki 750 hard tail (was rear end ratios) [/url]  Kawasaki 750 hard tail (was rear end ratios) [/url] 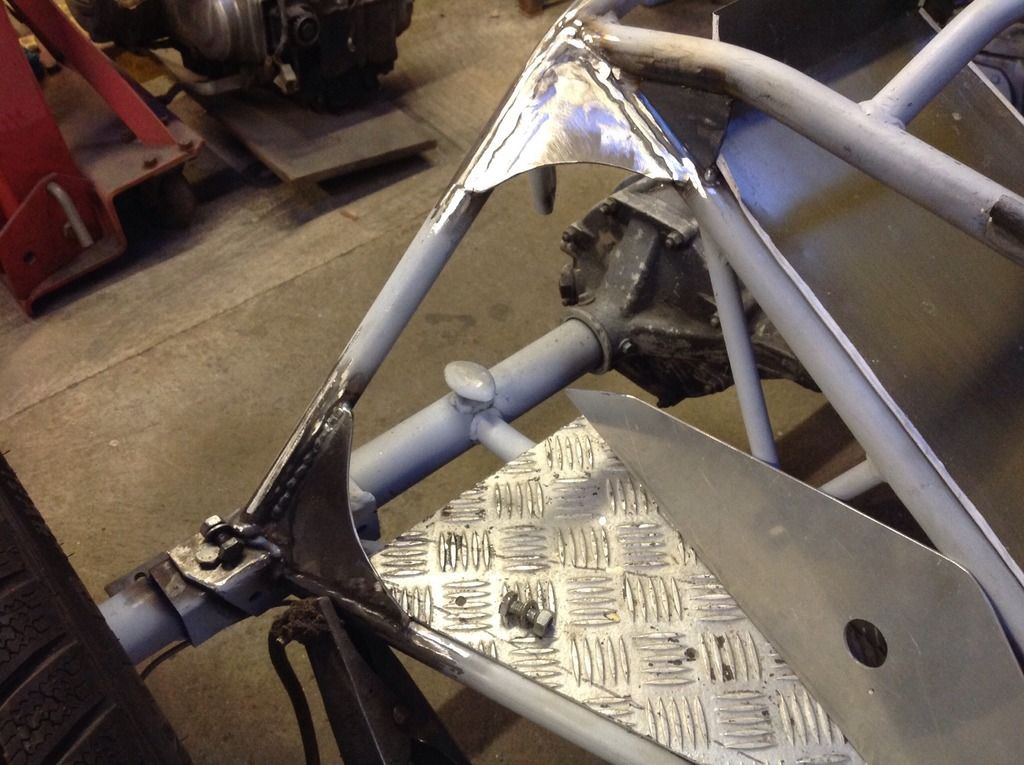 Kawasaki 750 hard tail (was rear end ratios) [/url] With any luck they'll come out ok, thinking about it, the only progress looks like the primer and some gussets, what's not obvious is the correction to the frame and lugs for brake pipes and foot plates. All the best. |
|
|
|
« Last Edit: June 14, 2015, 05:25:04 PM by minimutly »
|
Logged
|
|
|
|
|
minimutly
|
|
« Reply #189 on: June 14, 2015, 04:44:07 PM » |
|
Well, I don't know, I'm seeing two of all of these?
In the one of the axle, should have pointed out the axle vent - sort of egg shaped stainless bit welded onto the tube. The hole is up underneath the dome, so I shouldn't get any water in there.
|
|
|
|
|
Logged
|
|
|
|
|
minimutly
|
|
« Reply #190 on: June 27, 2015, 10:39:40 PM » |
|
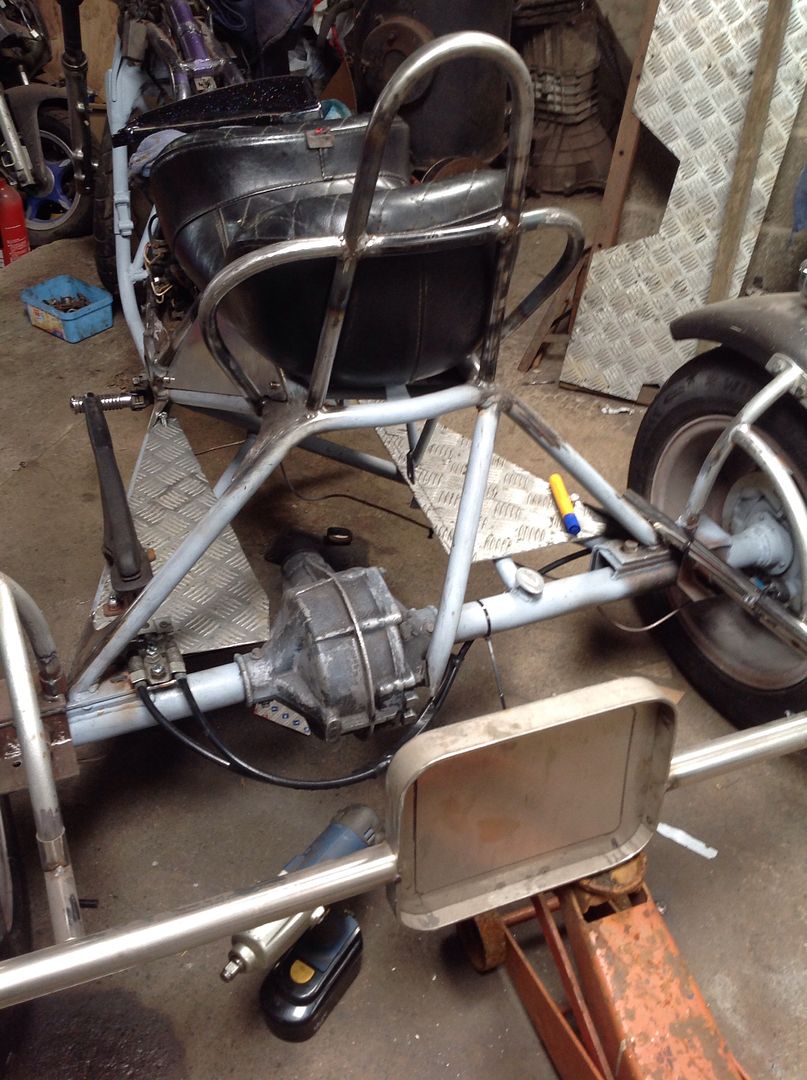
Bent up and tacked on the cissy bar this afternoon. also started on the grab handles (is that really what they're called?), from below the seat up and back across the cissy bar. The only problem is it highlights the seat cover/ foam being off to one side. Looks like I'll have to redo that bit again.
No chance to do any more for a while, off to Corfu for a week. I wonder if the airline co will be able to buy paraffin for the trip back? Hope not...
Huw
|
|
|
|
|
Logged
|
|
|
|
|
minimutly
|
|
« Reply #191 on: July 29, 2015, 11:29:36 PM » |
|
Cissy bar and grab rails finished, the curvs aren't perfect, so i may still try some heat to correct the nearside one, its not serious, but i can see it and it will annoy me.
Started on the handbrake, managed to fit the bar, using a pair of rover cables going to the mini backplates.
The issue ive come across is the cable runs look like something out of an Alien film, so i've decided to make some swivel quadrants to allow the cables to run along the axle line, if slightly in front of it.
I will need to make some swaged ends, anyone got any suggestions? I was thinking steel mig welded on the end?
|
|
|
|
|
Logged
|
|
|
|
|
minimutly
|
|
« Reply #192 on: August 13, 2015, 05:28:08 PM » |
|
I now have a handbrake!
I decided i didnt like the look of the cables coming at the drums in the direction they needed to to pull the levers, so i decided to make some mini style quadrants. These allow the cables to run allong the length of the axles, thereby making a neater job. Now they exit the rover handbrake mechanism, curve around the back of the diff, left and right to each wheel.
This means a step closer to paint, next is refixing the rear rack.
|
|
|
|
|
Logged
|
|
|
|
Manky Monkey
Administrator
Hero Member

Karma: 264
Posts: 55102

|
|
« Reply #193 on: August 13, 2015, 11:47:20 PM » |
|
Love the space frame chassis. Looking very swoopy Mr M. Nice.
|
|
|
|
|
Logged
|
On the last freedom moped out of Nowhere City.
|
|
|
|
minimutly
|
|
« Reply #194 on: August 14, 2015, 01:35:02 PM » |
|
 Kawasaki 750 hard tail (was rear end ratios) |
|
|
|
« Last Edit: August 14, 2015, 01:37:14 PM by minimutly »
|
Logged
|
|
|
|
|


