Manky Monkey
Administrator
Hero Member

Karma: 264
Posts: 55102

|
 |
« Reply #2415 on: October 24, 2010, 08:35:48 PM » |
|
Indicators & hazard warning switch.
|
|
|
|
|
 Logged
|
On the last freedom moped out of Nowhere City.
|
|
|
Manky Monkey
Administrator
Hero Member
Karma: 264
Posts: 55102
|
|
« Reply #2416 on: October 24, 2010, 08:58:49 PM » |
|
A little project for Loony when he has some spare time. I said I want to de-badge the truck -well maybe re-badge it. I was in B & Q this morning, (a chain of DIY stores for our overseas readers). They sell aluminium letters for making house names, (26 of em, strangely enough), & a couple of quid bought me an M.
Mr L made a start on chopping out the middle of the old Anglia badge with a die-grinder to set the M into it. A bit further to go yet to get it down flush then maybe re-chrome the base. Just putting our mark on the project.
|
|
|
|
« Last Edit: October 25, 2010, 08:46:07 AM by Manky Monkey »
|
Logged
|
On the last freedom moped out of Nowhere City.
|
|
|
|
poprodder
|
|
« Reply #2417 on: October 24, 2010, 10:34:24 PM » |
|
good work on switch, and excellent news on heater.
but not so keen on grill badge, sorry just my view. much prefer the oval(with maybe an m in that somehow)
|
|
|
|
|
Logged
|
|
|
|
|
cunningplan
|
|
« Reply #2418 on: October 25, 2010, 07:09:16 AM » |
|
but not so keen on grill badge, sorry just my view. much prefer the oval(with maybe an m in that somehow)
Same here I'm afraid  just dont look right |
|
|
|
|
Logged
|
|
|
|
Manky Monkey
Administrator
Hero Member
Karma: 264
Posts: 55102
|
|
« Reply #2419 on: October 25, 2010, 08:59:47 AM » |
|
O.K, duly noted guys.  I wanted to keep the oval as a nod to it's previous life as a Pop, (or Anglia actually. Export version of the Pop). I'd envisaged exactly this design as it's an identical font to the Morris steering wheel centre, & was going to cut an M from stainless until I saw them in the store. I thought overhanging it beyond the edges of the oval would look more stylish than keeping within it but am happy to be persuaded otherwise. I'd like to bend it to the curve of the bonnet but imagine it'd just fatigue & snap if we tried, especially as we haven't got any heat to soften it. My previous plan was to use another Moggy Minor horn push as a badge, cos the surround is exactly the same diameter as the oval & it has that rounded profile. I picked one up on Ebay for that purpose last week, but Loony thought it just made the Ford look like a Morris. The actual Morris badge is a bull over water. We'll carry on & see what it looks like when it's down flush with the bonnet. |
|
|
|
|
Logged
|
On the last freedom moped out of Nowhere City.
|
|
|
BikerGran
Hero Member

Karma: 94
Posts: 10604
Gran Turismo
|
|
« Reply #2420 on: October 25, 2010, 01:16:34 PM » |
|
How big is that oval? Cos coincidentally, it's the same shape as the MMM logo..........
|
|
|
|
|
Logged
|
You don't stop havin fun because you get old - you get old if you stop havin fun!
|
|
|
|
Archie
|
|
« Reply #2421 on: October 25, 2010, 07:12:10 PM » |
|
 Manky's Pop. |
|
|
|
|
Logged
|
|
|
|
|
Clive
|
|
« Reply #2422 on: October 25, 2010, 08:33:42 PM » |
|
How big is that oval? Cos coincidentally, it's the same shape as the MMM logo..........
Just what I was thinking!!!! PS Like the 'pinstripe' under the badge!! |
|
|
|
|
Logged
|
|
|
|
Manky Monkey
Administrator
Hero Member
Karma: 264
Posts: 55102
|
|
« Reply #2423 on: October 25, 2010, 09:49:23 PM » |
|
Very arty Archie.  The oval's about an inch & a half in diameter. I don't want to use the full logo on the bonnet cos it's already on the doors & the whole point is to streamline & de-clutter the truck. The Pop "spoon" badges are available new, so doesn't really matter if I destroy this one. A suggestion from Brock- cut the remains of the oval away to leave a "spear" & add the M below it. Not sure. |
|
|
|
« Last Edit: October 25, 2010, 10:07:48 PM by Manky Monkey »
|
Logged
|
On the last freedom moped out of Nowhere City.
|
|
|
Manky Monkey
Administrator
Hero Member
Karma: 264
Posts: 55102
|
|
« Reply #2424 on: October 25, 2010, 09:53:29 PM » |
|
The Morris Minor horn push. I reckon we should fit the loudest air horn we can find inside the grille, wire it up to the horn push & wait for the first show-goer to recognise it as a steering wheel centre & press it.  |
|
|
|
« Last Edit: October 25, 2010, 09:55:52 PM by Manky Monkey »
|
Logged
|
On the last freedom moped out of Nowhere City.
|
|
|
|
cunningplan
|
|
« Reply #2425 on: October 25, 2010, 10:05:17 PM » |
|
Very arty Archie. The oval's about an inch & a half in diameter. I don't want to use the full logo on the bonnet cos it's already on the doors & the whole point is to streamline & de-clutter the truck. The Pop "spoon" badges are available new, so doesn't really matter if I destroy this one. A suggestion from Brock- cut the remains of the oval away to leave a "spear" & add the M below it. Not sure. If that M was bent the same as the grill that would look a lot better |
|
|
|
|
Logged
|
|
|
|
Manky Monkey
Administrator
Hero Member
Karma: 264
Posts: 55102
|
|
« Reply #2426 on: October 25, 2010, 10:06:57 PM » |
|
Don't think I can bend it Tone, but I can file the underside to fit better. Made a start on that but ran out of time today.
The switch unit bolted to it's sleeve & tacked in place on the steering column. I wanted to check it'd be in a useable position. It is. The original Moggy Minor indicator stalk was on the right, but as the wheel's quite close to the door, I've put the new switch on the left. I like the way the red hazard light knob matches the gear knob. Next I need to make a housing for the dip switch.
|
|
|
|
|
Logged
|
On the last freedom moped out of Nowhere City.
|
|
|
Manky Monkey
Administrator
Hero Member
Karma: 264
Posts: 55102
|
|
« Reply #2427 on: October 25, 2010, 10:31:16 PM » |
|
Hurrah! At last, some big progress to report! Seem to be forever messing about with little detail parts lately. I know everything needs to be done, but I want to see big leaps forward so it feels like we're getting somewhere!
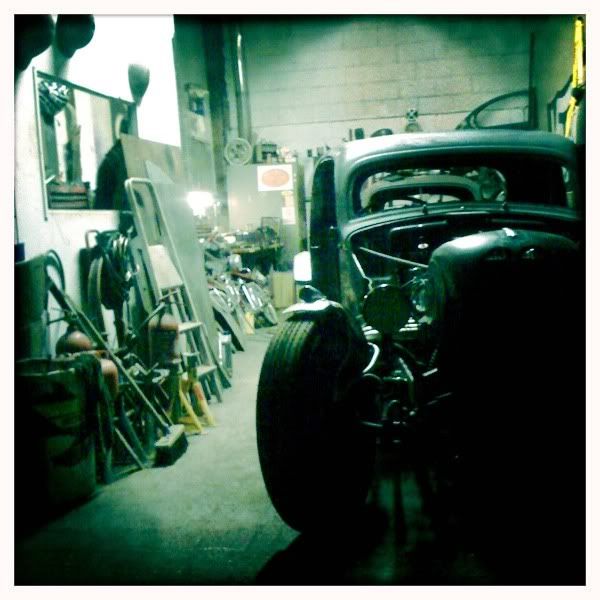
Well today we did. Mr Lunatic & I spent the afternoon piecing together the first of the exhaust headers. Being a V8 motor, it's got 4 pipes on each side, which will sweep back at roughly the same angle as the bodywork, into a pair of collectors, then through a silencer under each side of the cab, before running under the pick-up bed, over the back axle & out the back.
I bought a header "kit" last year from Custom Chrome, which is basically a big box of pre-formed stainless steel bends, plus the collectors & the flanges that bolt to the engine. The pipes are 1 & a half inch O/D, then 2 inch after the collector.
After some discussion on the best pipe pattern, we plumped for the rear one dropping straight down vertically, with a 90 degree bend into the collector, (a funnel shaped 4 into 1 thingy), & the rest at gradually increasing angles towards the front. Loony was in charge of fitting while I was chief pipe cutter.
"Block Hugger" header systems are available in cast or tubular versions for the Rover motor. These keep the pipes tight to the engine casing so they can exit between the motor & the chassis rails. No good to us though cos the steering box & linkages fill that space. Ours needed to step out wide, over the chassis, like "T bucket" pipes, then drop down between the suspension arms & the bodywork. They also need to clear the front wheels when they're on full lock. There's actually a lot more clearance than it looks in this photo.
|
|
|
|
« Last Edit: January 30, 2011, 12:00:16 PM by Manky Monkey »
|
Logged
|
On the last freedom moped out of Nowhere City.
|
|
|
Manky Monkey
Administrator
Hero Member
Karma: 264
Posts: 55102
|
|
« Reply #2428 on: October 25, 2010, 10:39:12 PM » |
|
At the moment they're just tacked together, using my MIG welder. I was going to bug my brother Brock to TIG weld them for us, but that'd involve several 70 mile journeys to his workshop & the chance that something might move in transit & they not fit afterwards. We'd rather weld them in situ if we can, so will use stainless steel wire in the MIG instead, (the mild steel wire we've got in the welder at the moment will produce welds that'll rust, especially when it gets hot). A lucky escape from several evening's work for Mr Brock. We plan to add 3 inch diameter kick outs into the sides of the collector boxes. These will exit under the bottom of the bodywork & have bolt-on blanking caps on the ends. A common sight on street/race cars, they allow you to run a full street legal exhaust system for normal road use, then short, open headers when you take the car to the drag track at weekends. Not really planning on racing the Pop, but they'll sound awesome at shows. |
|
|
|
« Last Edit: October 26, 2010, 07:07:43 PM by Manky Monkey »
|
Logged
|
On the last freedom moped out of Nowhere City.
|
|
|
Manky Monkey
Administrator
Hero Member
Karma: 264
Posts: 55102
|
|
« Reply #2429 on: October 25, 2010, 10:53:12 PM » |
|
Although we're not using the original inner wings, we've kept the curved top sections of them to visually tie the radiator grille to the rest of the body. They'll need stretching slightly as the grille's now further forward than standard, but will still follow the curved swages in the doors, up & over the front wheels, helping to retain the car's original lines & disguise the fact that the wheelbase is now longer. They also smooth out the chunky squareness of the chassis rails a bit by covering the sticky out front corners. We thought we'd have to cut huge chunks out of them to clear the exhausts, but looks like they just need a small notch out around number 2 pipe. With the bonnet & side panels on, the engine's completely hidden, with the pipes exiting neatly between the panels & the chassis rails, almost as if we planned it that way.
I'm not going to bother mirror polishing the stainless pipes. We'll blend in the joints in the tubes then just give them a buff up with some chrome cleaner. I like the way stainless discolours to blue & yellow with heat & think super blingy pipes would look wrong on a truck. I also intend to use it as often as possible so don't want to condemn myself to having to constantly polish them.
|
|
|
|
« Last Edit: October 25, 2010, 11:12:00 PM by Manky Monkey »
|
Logged
|
On the last freedom moped out of Nowhere City.
|
|
|
|


