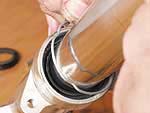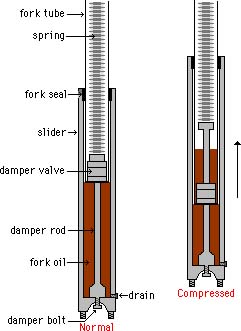
Hydraulic forks not only hold the front wheel of your bike or trike in place but also act as impact absorbers, (springs), and bounce dampeners, (shocks). As you’ll see, the typical assembly is actually a tube within a tube.
The fork tube is attached to the frame via the yokes, or “Triple Trees” for our American cousins, while the slider body is attached to the wheel. As the wheel hits a bump the slider is forced upward, compressing the spring and absorbing the force. The spring recovers and the slider returns to it’s normal position. To stop the wheel from compressing too far and to prevent any bouncing as the slider recovers, a hydraulic system kicks in. As the slider pushes upward, oil is forced through small holes in the damper valve and is allowed to enter the fork tube. As pressure is released on the slider, the spring forces the slider down and oil is drawn back into the lower slider chamber. The fork seal does three jobs, firstly scraping oil from the fork tube; secondly preventing oil from leaking out between the slider and fork tube and finally, it prevents any dirt from entering the assembly.
Normally, maintenance involves changing the fork oil every year or so and replacing the fork seal when leaking is spotted. Because of the difference in design, not all steps are relevant to all hydraulic fork systems, so the following is a basic step-by-step guide to changing the most common design of fork seals:
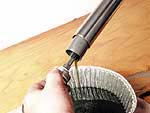
1) Remove the drain plug at the bottom of the fork leg, (usually a small screw in the outside face of the bottom of the slider). Place a bowl under it and allow the oil to drain out. Close the drain plug.
2) Loosen the brake caliper bolts and axle nut, also loosen but do not remove the fork cap bolt if fitted. This is usually much easier to do while the forks are still clamped in the yokes, rather than after they’ve been removed. If you have an air pressurised system, bleed the air pressure off first!
3) Place a jack or other support under the engine or front of the frame and lift the front wheel from the ground.
4) Remove the mudguard, brake calipers, speedometer cable and wheel. Some bikes/trikes may have their headlight brackets attached to the forks so their removal is also required. CAUTION: support the hydraulic brake calipers so their weight isn’t hanging on the flexible brake pipes or damage could occur.
5) Loosen the yoke clamp bolts, and any other relevant fittings and slide the fork down and out with a twisting motion, being careful to open the yoke clamps far enough that they won’t scratch the tubes as they are removed. It may be necessary to hold the clamp open with a screwdriver or similar while you do this.
6) Carefully remove the top tube cap.
CAUTION: there may be some pressure due to the internal spring! It may be wise to cover the top of the tube with a cloth while you do this to catch the cap as it’s freed. Remove the spring. Some models have a top bolt holding the spring. If so remove carefully it as well.
7) Remove the spring and tip out any remaining oil. Remove the fork seal dust cover if fitted.
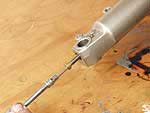
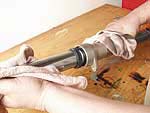
8) On the very bottom of the fork leg you’ll find a bolt that holds the damper rod in place. Remove the damper rod securing bolt and slide out the fork tube.
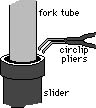
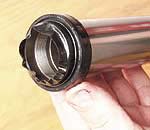
9) There will be some kind of circlip on top of the fork seal, in the top of the slider. Remove the circlip using a pair of suitably sized circlip pliers. The pliers have pins designed to fit in the holes in the open ends of the circlip to enable it to be compressed & removed.
10) If the fork seal is still in place at this point, work it out with a pair of needle-nosed pliers or a screwdriver placed across the top of the seal & under the opposite side of it to lever it up & out of the slider body. CAUTION: Attempting to drive a screwdriver down the outside edge of the seal will damage the fork slider body & may result in oil seepage when the new seal is fitted.
11) Inspect the chromed fork tube for pit marks. If you see many, the fork may still leak even with a new seal or it may wear out the seal at an accelerated rate. It’s possible to temporarily build up pitting or scratches with epoxy glue, but ideally the fork tube should be re hard-chromed or replaced.
12) Replace the fork tube, and any washers etc that were fitted, in the slider. There’s usually a cone-shaped piece that fits in the bottom of the tube. Re-attach the damper rod with its bolt, through the bottom of the slider, into the bottom of the fork tube. Apply fork oil to the inside of the fork seal and slide the new seal over the fork tube.
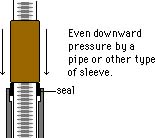
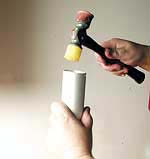
13) The seal must be pushed back into place with an even pressure all around the fork tube. The only way to accomplish this is to slide a pipe or other tube over the fork tube that is about the same size as the new seal. With an even push, press down on the pipe and seat the fork seal. CAUTION: if you are not careful, you can damage the seal! Most seals have a small spring that holds the internal rubber lip against the fork tube, make sure it is undamaged!
An alternative method is to fit the new seal into the top of the slider before sliding in the tube. The seal can then be tapped into place using a suitable sized socket & a mallet. Again, lubricate the inside of the seal before carefully sliding the tube back in. Gently push & pull on the tube a few times to check the seal’s lip is sitting squarely against the tube all the way around & hasn’t been forced inwards as the tube is slid into place.
14) Re-assemble the fork, (don’t forget the circlip & the dust seal if fitted), and before placing on the top cap, refill with oil as per the manufacturers’ manual.
15) Check the completed fork assembly compresses & rebounds smoothly by holding it upright on the ground & pushing down on the top of the tube. Repeat the whole process with the second fork if necessary.
16) Re-assemble the front end of your bike or trike, making sure to do a final check to ensure all mounting bolts are secure before CAREFULLY road-testing your machine.
If you doubt your mechanical abilities, always seek the help of a qualified bike mechanic.
-Tbone