MANKY MONKEY FUNKY FURNITURE.
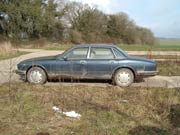
Some time ago now I bought a fibreglass ‘27 Ford roadster body with the intention of building myself a 50s style hotrod. I’m still quietly collecting the bits together for that one, but as part of it I was recently given a Jag. For free. A fully functioning, up ‘n’ running, 4 litre straight 6 auto Jaguar AJ6. A lovely car. It was only 11 years old & would’ve originally cost someone an awful lot of money. So we ripped it apart. Having torn out the engine, gearbox, propshaft & exhaust, the rest was due to be scrapped, but it seemed a shame to bin the lovely cream leather upholstery. The front seats were too big to fit the rod so were donated to a friend, who’s son now has them in his bedroom & lounges on them to play his computer games. I was tempted to keep one & build a swivel base for it from an old Reliant axle tube & driveshaft I’ve got in my garage but, well, I’ve already got too many projects & not enough time!
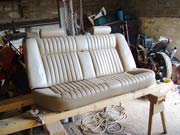
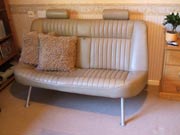
I did pull out & keep the rear seat though. It’s leather is maybe in need of a bit of a scrub but it had survived years of use intact & deserved a new home -mine. So Flap & I set to work in my brother Steve’s workshop. Using the same 1 inch bore heavyweight ERW tubing we use for the trike frames, we spent an afternoon knocking up a basic framework to support the base & seat back. Not an easy thing to do when we had no way of supporting it all in the right position while we measured up, but after a couple of false starts it eventually worked out O.K
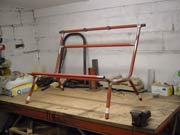
The back of the seat originally hooked onto metal tangs spot welded to the inner body shell of the car, so we reproduced these in angle iron & welded them to the back of our frame. Once that’s hung in place, the seat base pushes up against it to hold the bottom edge steady & is bolted to the front frame rail with 6mm bolts using the original Jag mounting tabs.
Having sorted out the basics of the design, Steve then took over. He’s a self employed carpenter & joiner by trade as well as a qualified engineer, so had a far better chance of producing 4 legs of the same length! I’d originally envisaged the frame ending in chrome plated 70s style looped supports, while Steve fancied cutting one of the Jag wheel rims in half with the plasma cutter & sitting the frame on those. In the end we opted for 4 simple straight legs, splayed out slightly to stop the seat moving either side to side or back & forth as people sit on it.
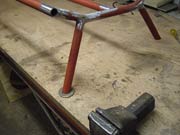
Next job was to find some feet for it. The cut-off tubular ends of the legs would soon slice through my carpets under the weight of a sitter, so we cast around for some suitable flat plate. Steve had a pair of Austin Mini sub frame washers, which are about 3 inches in diameter & about ¼ of an inch thick. Ideal. Unfortunately he only had 2 so I picked up 4 new ones from a local tool shop. With these welded in place the completed frame was despatched to the powder coaters & returned 3 days later resplendent in a coat of sparkly metallic silver. Not bad for 30 quid including shot blasting. There are 4 open tube ends on the frame so I picked up a handful of black plastic bungs from a trailer shop. The owner couldn’t be bothered to work out the price for them so let me have them for free!
We took the completed Jaguar sofa with us to the recent Shepton Mallet bike show, where it got used constantly all weekend. Everybody agreed it’s very comfy & surprisingly stylish in a 60s retro kinda way. All that remains now is to have the exposed foam on the back & underside covered in cream or black vinyl & it’ll be installed in my little flat. It even has a fold down armrest for my cordless computer mouse!
-Andy.